Thursday 16 October 2014

The Server side: webapp performance architecture with Django, load balancing and caching

Web apps need to be quick by reducing latency while serving client requests. In all applications persistent data is on a database on disk (some use solid state too) and the web app on server accesses it. While a few concurrent connections will be easily handled by issuing database requests, when it comes to thousands or millions of requests this approach will fail fast. Scaling up by utilizing powerful hardware is a solution which can buy time until the next growth level of client requests. Even on a scaled up hardware there is room to squeeze more requests through if data caching is part of the design. Accessing data from disk / another server on the network is slower than accessing it from the memory. If the round trip can be avoided this enables fewer comparatively low cost hardware to easily handle considerable loads without increasing latency. A profiling of response times is on the next post. Once server side things like what is the app's actions, when it acts, how fast & efficiently are thought out, the data model can be designed for maximum throughput too.

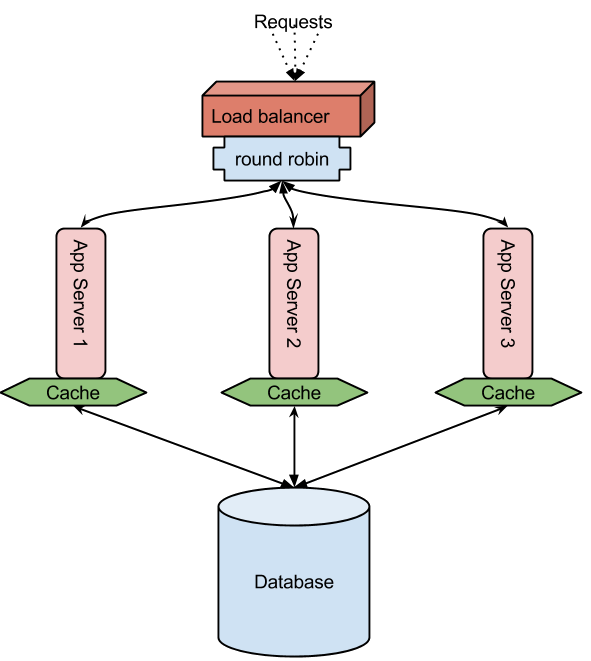
Here we look at horizontally deploying multiple application servers and a single back end database which handles these app servers' data requests. These app servers are load balanced in round robin method for requests from the external world. Each request to a webapp is given to a different app server. Sticky sessions can also be enabled but that won't be round robin'ed. The objective of round robin is to decrease latency caused by the wait if it was only one server. However, in this scenario the database handles all the app servers. If not addressed this becomes a contention easily thus taking everything to square one. On closer analysis of most web apps/sites/services it would be possible to avoid unnecessary database calls with caching. (The next level to improve performance would be database sharding) What this helps is saving the cost of a network/disk call. Imagine having a good pizza ready on the kitchen table rather than you having call Dominos' or Pizza hut's home delivery. In the case you had to call home delivery, ask for pizzas and keep some ready in your refrigerator just in case someone suddenly gets the urge thus saving you and them the wait next time.  Pizzas become stale, so do data. There has to be precise cache invalidation when the database record is updated. The point is that you might have to hit the database but it is not needed every time a request is made. 


Software:
OS: Opensuse 13.1 or any Linux
Web app: developed on Django framework.
Webserver: Apache2 with mod_wsgi to host python webapp
Caching: Memcached
Database: Postgresql
Load balancing: nginx
# application servers: 3
# loadbalancing node: 1


Django code with sample view that uses the cache:

Wireshark trace showing the round robin requests and responses

Memcached on the three server with hits count thus avoiding the database:

Monday 25 August 2014

Celatum Pro 3.0 with secure chat feature : "Every message matters"

Celatum Pro version 3.0 has been published. This version of the Android app has a new feature for secure chat. It allows you to secure your instant messages with encryption. Every message is encrypted with a different key.

Availability: Check out Google Play and Amazon app stores for downloads in select countries.
Languages Supported: German, Russian, English, Spanish, French and Portuguese.

Think your instant messages are secure? Think again. On all existing messaging systems the channel is secured with SSL and the like. This does not mean your data is secure. Once out of the channel at the server side, the data itself is available in plain sight at the service provider's server.

Celatum Pro offers encryption of the data itself so that, when the message is not viewable for the messaging service provider. This feature is an extension of the existing encryption feature of Celatum Pro which allowed secure text attachments.

Checkout the features on Play and Amazon stores for the app.


Wednesday 25 June 2014

Web page scraper design using blueprints

This post is available as a presentation here

Services and apps that supply information from multiple sites generate the data by scraping information from web pages. For example, an application that provides third party retail product information gets the data from the retailers web site. This is done by crawler programs which visit the webpage and scraper programs which extract the required information from the page. Scraping is done by taking advantage of how a site designs or structures its web pages. Sites structure webpages using html and look & feel via Cascaded Style Sheets. Every site has a particular structure or template used by the web developers. For example, the news website CNN has a structure for presenting various information. Their html page structure is different from BBC's page. Retail websites' pages are no different. In order to get to the required information, scraper programs can extract the html or CSS elements of interest one-by-one until it gets to the data. For example, the following snap shows the product name in an element within an html webpage. 


This works until the websites change the structure of the pages altogether. So scrapers need to be designed to quickly adapt to changes in structure of the target pages. Pages populated in a lazy manner with Java Script pose another challenge. But, this latter challenge can be addressed by using tools like Selenium. A scraper must simply adapt to the page changes i.e once the elements containing the target data have been identified, the scraper should go after those elements.

Scrapers can be designed to take metadata of information that needs to be extracted. We can call this the blueprint based on which the scraper will work on a particular page set. The meta data can contain the list of elements to be scraped for a piece of data i.e data piece and list of elements. The blue print for the whole information to be obtained from a page can include a list of data pieces and their corresponding elements. Another program can generate this blue print and once tested can be given to the scraper. A scraper library in Java which uses this blueprint approach is show below. This also includes a small API to generate the blue print and also to use the scraper. 


The core idea in this scraper design is devolution of responsibilities. The scraper/library used is a program that take a web page and a blueprint. It scrapes the page based on the blueprint and returns the information. It should not have to or be made to think of the type or nature of the object/information scraped. i.e it should scrape an abstract object. It should be the job of the program requesting the information to tightly set an identity to the scraped information. 

For example, when a retail web page needs to be scraped, the scraper need not know that it is an object, say a Java object of type say, RetailItem. It only needs to know that, this scraped object has an attribute "name" and also an attribute "price". Plus their values i.e the actual name and price (HydroFlask and $50). Nothing more. A scraper like this builds key value pairs to represent the object scraped. In programming this is an object as a collection of attributes in a map.

Not only that, the blue print itself can be a set of key value pairs where the keys are attribute names and values are the list of elements to be pulled.

A blueprint screen with key "brand" and one html/css element to be pulled is shown below.


Selectors as shown in the image specify the elements to be followed or pulled to get to the information. In this example, a div element with id product-tabs needs to be pulled from the page. 

Now that, the scraper just takes a blue print and generates an abstract object as keys and values, all that remains is sharing the blueprint. This can be done using JSON format. GSON library can be used to handle the format and conversions to and from binary. 

The object that is scraped is a simple java object which holds a map as shown below.

The blueprint is also similar in structure as a key value pair holder.

 The API altogether looks like this in final


The blueprint can be built one selector at a time using the API as follows.


Finally a sample blueprint itself in JSON is as follows


Friday 23 May 2014

Accomodate data via interning - Java

Software receives data from multiple sources and holds necessary portions of it in memory. Data may be read from disks and networks. More data can be fit into a program's memory if, only one copy of relevant data is stored. For example, lets say a software keeps track of vehicles and related information like number plates. Vehicles' number plates are registered in a state. The software does not need to have multiple copies of a Registered State object for each vehicle registered in the same state. If there are a 100000 vehicles registered in Colorado, then only one instance of the Registered State of Colorado is needed. If the Object's state does not change for the execution time, this saves space. This approach called Flyweight Pattern or interning is used to hold 'immutables' in a program. 

The following screen shows the profiling of the example described above. A collection of 100000 vehicles is built and all of them are set to Registered State (Colorado). On the profiler output we see that, once the data loading is finished there is only one Live Registered State representing Colorado. 

Profile Output:


Code for intern store
Here we use a synchronized map to hold weak references to an instance. Each class is again mapped to these 'maps of instances'. For the purpose of storing the objects in synchronized maps, we override the hashcode method for the data object. For this the program we use HashCodeBuilder from Apache libraries (commons-lang-2.4.jar).

Source for the sample is here

This is the case with Python too. An example on the Python shell to count the active reference to a string object and object ids is shown below.


References
------------------
1) ACM Webinar on Taking the Big out of Big Data By Kate Matsurdia
2) Apache Commons library

Tuesday 20 May 2014

Java Non-blocking IO - Part 1

Non blocking Input Output package aims to increase performance and improve responses. In regular blocking IO you read from a socket's stream and block on the read() until you get data. In NIO, you register to be notified of events and respond only when that event occurs. Programs can avoid blocking and take action on being notified. NIO uses channels and 'a channel represents a connection to stuff like sockets, files etc and can perform multiple io operations like read, write'. Instead of an inputstream and outputstream we have a single channel to both. A profiling of NIO servers here shows that a design with NIO may not always be better than a normal multi-threaded blocking IO design for applications. Using NIO on a client like mobile devices may not (or may) be useful but for a server it may be different. Registering for events is done via 'Selectors'. Multiplexing channels is made possible via Selectors. A Selectable (multiplexable) Channel's registration with a Selector for events is represented by Keys in the Selector for different operations. When a bunch of operations on the SelectableChannel is available, the selector gives keys representing those operations.

To write a simple NIO server which accepts connections
1) open a ServerSocketChannel & set is as non-blocking
2) get the underlying socket for the channel just created & bind it to an address.
3) open a  selector
4) register the ServerSocketChannel with the Selector for a OP_ACCEPT operation. 

To handle different events
1) check the selectors for the number of ready operations (keys set)
2) if it is -1 continue to wait for an event.
3) Once there are keys to go with, retrieve the keySet which holds the keys whose channels are ready.
4) Loop through each key and handle the corresponding IO.
4a) Filter operations types by comparing the keys' ready operation code.
5) mark key as handled. (remove it)

To Write and Read from Channel:
Channels perform two-way communication and handle blocks of Data. These blocks of data are read 'into' and written 'out from' Buffers. Buffers have internal byte arrays to hold the data and can be retrieved.
Buffers have a current position from where data will be next read or written into. Flipping a buffer sets the limit as the current position and returns the position to the beginning. So if we want to use the data so far read into a buffer b and send the same data out using the same buffer, we need to flip it. This code just sends the data back.

The full code for the project is here. The client app in the project simply keeps track of time taken to get a response from the server.


Sunday 27 April 2014

Java Observer design pattern

Observer is a behavioral pattern. This pattern defines a publisher-subscriber communication model between a set of objects called observers and a set of objects, the observed or subjects, on whom the observers are dependent on. Observers want to know changes in the state of the subjects. Instead of maintaining a static list of observers or interested parties in the subject, the pattern allows observers to register and unregister from subjects.  Subjects notify the observers on an interesting event or change.

A simple scenario involves a customer sending a courier via courier company. The customer needs to be notified of the state of the courier. Here the courier company is holding something that the customer is interested in. The customer is the observer and the courier company is the subject. 

1) Customers (Observers) need to register & un-register from the courier company notifications.

2) Courier company provides a mechanism for the customers to register, un-register and also notify them on status changes.

In Java this is accomplished via interfaces. 

An Observer interface: Every observer needs to expose a mechanism with which to be notified. This is provided by the Observer interface.

An Observable interface: Every subject exposes mechanisms as mentioned in (2) above. 

Sample Observer and Observable interfaces are shown below.

The Courier company implements the Observable interface as follows
The Customer implements the Observer interface which provides an entry point for notifications.

Application code using the pattern is
The advantages of using the observer pattern are

1) Subjects need not maintain a static list of interested parties.
2) Observers can subscribe and un-subscribe as needed.
3) Adding Observers does not change anything in the Subjects.
4) State change logic of Subjects do not affect Observers either. 

Complete code for the project is available here.

Wednesday 19 March 2014

Friday 21 February 2014

Retail Fashion - Fashionista For Android

This is a free software. Retail Fashion at your finger tips. Check it out on your Android device.

Do you follow Retail Fashion brands like Emporio Armani and Marks and Spencer?  Are you always on the lookout for the latest from fashion retailers?

'Retail Fashion' brings fashion products and Prices on your Android phones and tablets at your finger tips.

Have you gone to a fashion store and forgotten the T-Shirt brand and design you saw online? Wish you could show a photo or the product details? Retail Fashion on Android will do just that.

Next time you are winding up your day and feel tired of starting your laptop to browse fashion retail, remember you have Retail Fashion on Android mobile or tablet.

A) Features
-----------------
1) Find and Save favorite lines/categories. (Check out the screen shots)
2) Sift through saved categories.
3) Save retail items to buy at store.
4) Your data connection/Wifi is used only when needed.
5) Product prices also listed.

B) Info for users
------------------------
a) Current support for Emporio Armani US and Marks and Spencer UK. More retailers will follow.
b) Wish to add a retailer? or a feature. Contact the developer!
c) "Retail Fashion on Android" is the store listing name. App name on your phone is Fashionista.


C) Information for retailers
-----------------------------------
a) "Retail Fashion" cloud servers do not store images from Retailers.

*b) Do you want to reach out to millions of users with this mobile software branded exclusively for you? Get in touch with the developer.

D) Software license agreement
---------------------------------------
https://docs.google.com/document/d/1doaUJOmL1GTpq-geniMxhr-o5MUDriyABly-BiOiZOQ/edit?usp=sharing

Friday 10 January 2014

Task Queues in Python: Getting work done on Google AppEngine Cloud

The previous post mentioned task queues in AppEngine's application model. This post is an example of push queues for Google AppEngine in Python 2.7. Task queues come close to the concept of getting work done in parallel in an application. In addition to that, it is closely associated with doing work in small chunks rather than in total. Task queues are useful when you have to do deferred tasks. If the task does not need to be done immediately or if the result need not be shown to the user immediately, then queue it for deferred execution.

AppEngine tasks are put in queues. In a push queue, AppEngine takes tasks off a queue and processes them. When you write the code to pull tasks too then it is a pull queue. In a pull queue Apps need to take a finished task off the queue too. By default queues are push queues. Once tasks are on a queue, we need to execute them. Task execution is realised by writing url handlers for each queue. For every queue there is a url and a handler. The url for a queue is of the form /_ah/queue/<queue name>. When AppEngine is taking tasks off a push queue for execution, it POSTs to this url for the queue. The application needs to handle this post request. The post code is where the application does what is needed to be done in a task. Task queues also help in times when an AppEngine instance was terminated in the middle of a task. Each task has a task name and AppEngine remembers the name for some time. So duplicate tasks cannot be queued. There are mechanism to adjust the frequency/speed of queue execution. Each queue executes a task on it if, it has a token. Tokens are available in buckets and tokens are replenished. Apps can specify the rate of replenishing and the bucket size too. If five tasks are on the queue and there are 4 tokens, 4 of those tasks are executed. The remaining wait until replenishment. Tasks also provide a built-in mechanism to recover from failure. Failed tasks are retried automatically. The mechanism for retries can be controlled. Applications can specify task age, retry limit and back off mechanism. Again tasks queues have a target which can be pointed to a backend instance, in which case the back end executes the queue's tasks.

An example of a GAE task push queues:
Python sample code for task queues is available here. In this example, a master queue is used to hold a master task. A master task is an aggregate task with subtasks. A sub task in this example simply counts from A to B and return a list. Master task specifies subtasks for a number of intervals A & B. If subtasks are done. Then master task is done too. The master task is pushed on to its queue. From there, it is taken off the queue and does its job of creating subtasks. The master task pushes subtasks on to a separate queue for execution. i.e We tie the task queues together here. Sub tasks get executed as and when their time comes. A unique master task (name, refer code) cannot be duplicated. The same is true for subtasks. In this example, The subtasks simply write the counts to the backends log. The log is also shown below. The back end also has a shutdown hook. (refer sample code). Parameters to tasks can be sent using key-value pairs and as payload.

a) Backend definition in yaml file. This backend is the target for queues in this code.

b) Queue definition in yaml.

c) App yaml file. Watch the url handlers for queues

d) Code to enqueue an item to a task with check for tombstoned and duplicate tasks. Task params are sent using key value pairs. Here the value is a pickled task object.
e) Master Queue status after run
f) Sub tasks in seperate queue
g) Log showing the execution

Code download for this app is available here.