Monday, 25 August 2014

Celatum Pro 3.0 with secure chat feature : "Every message matters"

Celatum Pro version 3.0 has been published. This version of the Android app has a new feature for secure chat. It allows you to secure your instant messages with encryption. Every message is encrypted with a different key.

Availability: Check out Google Play and Amazon app stores for downloads in select countries.
Languages Supported: German, Russian, English, Spanish, French and Portuguese.

Think your instant messages are secure? Think again. On all existing messaging systems the channel is secured with SSL and the like. This does not mean your data is secure. Once out of the channel at the server side, the data itself is available in plain sight at the service provider's server.

Celatum Pro offers encryption of the data itself so that, when the message is not viewable for the messaging service provider. This feature is an extension of the existing encryption feature of Celatum Pro which allowed secure text attachments.

Checkout the features on Play and Amazon stores for the app.


Wednesday, 25 June 2014

Web page scraper design using blueprints

This post is available as a presentation here

Services and apps that supply information from multiple sites generate the data by scraping information from web pages. For example, an application that provides third party retail product information gets the data from the retailers web site. This is done by crawler programs which visit the webpage and scraper programs which extract the required information from the page. Scraping is done by taking advantage of how a site designs or structures its web pages. Sites structure webpages using html and look & feel via Cascaded Style Sheets. Every site has a particular structure or template used by the web developers. For example, the news website CNN has a structure for presenting various information. Their html page structure is different from BBC's page. Retail websites' pages are no different. In order to get to the required information, scraper programs can extract the html or CSS elements of interest one-by-one until it gets to the data. For example, the following snap shows the product name in an element within an html webpage. 


This works until the websites change the structure of the pages altogether. So scrapers need to be designed to quickly adapt to changes in structure of the target pages. Pages populated in a lazy manner with Java Script pose another challenge. But, this latter challenge can be addressed by using tools like Selenium. A scraper must simply adapt to the page changes i.e once the elements containing the target data have been identified, the scraper should go after those elements.

Scrapers can be designed to take metadata of information that needs to be extracted. We can call this the blueprint based on which the scraper will work on a particular page set. The meta data can contain the list of elements to be scraped for a piece of data i.e data piece and list of elements. The blue print for the whole information to be obtained from a page can include a list of data pieces and their corresponding elements. Another program can generate this blue print and once tested can be given to the scraper. A scraper library in Java which uses this blueprint approach is show below. This also includes a small API to generate the blue print and also to use the scraper. 


The core idea in this scraper design is devolution of responsibilities. The scraper/library used is a program that take a web page and a blueprint. It scrapes the page based on the blueprint and returns the information. It should not have to or be made to think of the type or nature of the object/information scraped. i.e it should scrape an abstract object. It should be the job of the program requesting the information to tightly set an identity to the scraped information. 

For example, when a retail web page needs to be scraped, the scraper need not know that it is an object, say a Java object of type say, RetailItem. It only needs to know that, this scraped object has an attribute "name" and also an attribute "price". Plus their values i.e the actual name and price (HydroFlask and $50). Nothing more. A scraper like this builds key value pairs to represent the object scraped. In programming this is an object as a collection of attributes in a map.

Not only that, the blue print itself can be a set of key value pairs where the keys are attribute names and values are the list of elements to be pulled.

A blueprint screen with key "brand" and one html/css element to be pulled is shown below.


Selectors as shown in the image specify the elements to be followed or pulled to get to the information. In this example, a div element with id product-tabs needs to be pulled from the page. 

Now that, the scraper just takes a blue print and generates an abstract object as keys and values, all that remains is sharing the blueprint. This can be done using JSON format. GSON library can be used to handle the format and conversions to and from binary. 

The object that is scraped is a simple java object which holds a map as shown below.

The blueprint is also similar in structure as a key value pair holder.

 The API altogether looks like this in final


The blueprint can be built one selector at a time using the API as follows.


Finally a sample blueprint itself in JSON is as follows


Friday, 23 May 2014

Accomodate data via interning - Java

Software receives data from multiple sources and holds necessary portions of it in memory. Data may be read from disks and networks. More data can be fit into a program's memory if, only one copy of relevant data is stored. For example, lets say a software keeps track of vehicles and related information like number plates. Vehicles' number plates are registered in a state. The software does not need to have multiple copies of a Registered State object for each vehicle registered in the same state. If there are a 100000 vehicles registered in Colorado, then only one instance of the Registered State of Colorado is needed. If the Object's state does not change for the execution time, this saves space. This approach called Flyweight Pattern or interning is used to hold 'immutables' in a program. 

The following screen shows the profiling of the example described above. A collection of 100000 vehicles is built and all of them are set to Registered State (Colorado). On the profiler output we see that, once the data loading is finished there is only one Live Registered State representing Colorado. 

Profile Output:


Code for intern store
Here we use a synchronized map to hold weak references to an instance. Each class is again mapped to these 'maps of instances'. For the purpose of storing the objects in synchronized maps, we override the hashcode method for the data object. For this the program we use HashCodeBuilder from Apache libraries (commons-lang-2.4.jar).

Source for the sample is here

This is the case with Python too. An example on the Python shell to count the active reference to a string object and object ids is shown below.


References
------------------
1) ACM Webinar on Taking the Big out of Big Data By Kate Matsurdia
2) Apache Commons library

Tuesday, 20 May 2014

Java Non-blocking IO - Part 1

Non blocking Input Output package aims to increase performance and improve responses. In regular blocking IO you read from a socket's stream and block on the read() until you get data. In NIO, you register to be notified of events and respond only when that event occurs. Programs can avoid blocking and take action on being notified. NIO uses channels and 'a channel represents a connection to stuff like sockets, files etc and can perform multiple io operations like read, write'. Instead of an inputstream and outputstream we have a single channel to both. A profiling of NIO servers here shows that a design with NIO may not always be better than a normal multi-threaded blocking IO design for applications. Using NIO on a client like mobile devices may not (or may) be useful but for a server it may be different. Registering for events is done via 'Selectors'. Multiplexing channels is made possible via Selectors. A Selectable (multiplexable) Channel's registration with a Selector for events is represented by Keys in the Selector for different operations. When a bunch of operations on the SelectableChannel is available, the selector gives keys representing those operations.

To write a simple NIO server which accepts connections
1) open a ServerSocketChannel & set is as non-blocking
2) get the underlying socket for the channel just created & bind it to an address.
3) open a  selector
4) register the ServerSocketChannel with the Selector for a OP_ACCEPT operation. 

To handle different events
1) check the selectors for the number of ready operations (keys set)
2) if it is -1 continue to wait for an event.
3) Once there are keys to go with, retrieve the keySet which holds the keys whose channels are ready.
4) Loop through each key and handle the corresponding IO.
4a) Filter operations types by comparing the keys' ready operation code.
5) mark key as handled. (remove it)

To Write and Read from Channel:
Channels perform two-way communication and handle blocks of Data. These blocks of data are read 'into' and written 'out from' Buffers. Buffers have internal byte arrays to hold the data and can be retrieved.
Buffers have a current position from where data will be next read or written into. Flipping a buffer sets the limit as the current position and returns the position to the beginning. So if we want to use the data so far read into a buffer b and send the same data out using the same buffer, we need to flip it. This code just sends the data back.

The full code for the project is here. The client app in the project simply keeps track of time taken to get a response from the server.


Sunday, 27 April 2014

Java Observer design pattern

Observer is a behavioral pattern. This pattern defines a publisher-subscriber communication model between a set of objects called observers and a set of objects, the observed or subjects, on whom the observers are dependent on. Observers want to know changes in the state of the subjects. Instead of maintaining a static list of observers or interested parties in the subject, the pattern allows observers to register and unregister from subjects.  Subjects notify the observers on an interesting event or change.

A simple scenario involves a customer sending a courier via courier company. The customer needs to be notified of the state of the courier. Here the courier company is holding something that the customer is interested in. The customer is the observer and the courier company is the subject. 

1) Customers (Observers) need to register & un-register from the courier company notifications.

2) Courier company provides a mechanism for the customers to register, un-register and also notify them on status changes.

In Java this is accomplished via interfaces. 

An Observer interface: Every observer needs to expose a mechanism with which to be notified. This is provided by the Observer interface.

An Observable interface: Every subject exposes mechanisms as mentioned in (2) above. 

Sample Observer and Observable interfaces are shown below.

The Courier company implements the Observable interface as follows
The Customer implements the Observer interface which provides an entry point for notifications.

Application code using the pattern is
The advantages of using the observer pattern are

1) Subjects need not maintain a static list of interested parties.
2) Observers can subscribe and un-subscribe as needed.
3) Adding Observers does not change anything in the Subjects.
4) State change logic of Subjects do not affect Observers either. 

Complete code for the project is available here.

Wednesday, 19 March 2014

Friday, 21 February 2014

Retail Fashion - Fashionista For Android

This is a free software. Retail Fashion at your finger tips. Check it out on your Android device.

Do you follow Retail Fashion brands like Emporio Armani and Marks and Spencer?  Are you always on the lookout for the latest from fashion retailers?

'Retail Fashion' brings fashion products and Prices on your Android phones and tablets at your finger tips.

Have you gone to a fashion store and forgotten the T-Shirt brand and design you saw online? Wish you could show a photo or the product details? Retail Fashion on Android will do just that.

Next time you are winding up your day and feel tired of starting your laptop to browse fashion retail, remember you have Retail Fashion on Android mobile or tablet.

A) Features
-----------------
1) Find and Save favorite lines/categories. (Check out the screen shots)
2) Sift through saved categories.
3) Save retail items to buy at store.
4) Your data connection/Wifi is used only when needed.
5) Product prices also listed.

B) Info for users
------------------------
a) Current support for Emporio Armani US and Marks and Spencer UK. More retailers will follow.
b) Wish to add a retailer? or a feature. Contact the developer!
c) "Retail Fashion on Android" is the store listing name. App name on your phone is Fashionista.


C) Information for retailers
-----------------------------------
a) "Retail Fashion" cloud servers do not store images from Retailers.

*b) Do you want to reach out to millions of users with this mobile software branded exclusively for you? Get in touch with the developer.

D) Software license agreement
---------------------------------------
https://docs.google.com/document/d/1doaUJOmL1GTpq-geniMxhr-o5MUDriyABly-BiOiZOQ/edit?usp=sharing

Friday, 10 January 2014

Task Queues in Python: Getting work done on Google AppEngine Cloud

The previous post mentioned task queues in AppEngine's application model. This post is an example of push queues for Google AppEngine in Python 2.7. Task queues come close to the concept of getting work done in parallel in an application. In addition to that, it is closely associated with doing work in small chunks rather than in total. Task queues are useful when you have to do deferred tasks. If the task does not need to be done immediately or if the result need not be shown to the user immediately, then queue it for deferred execution.

AppEngine tasks are put in queues. In a push queue, AppEngine takes tasks off a queue and processes them. When you write the code to pull tasks too then it is a pull queue. In a pull queue Apps need to take a finished task off the queue too. By default queues are push queues. Once tasks are on a queue, we need to execute them. Task execution is realised by writing url handlers for each queue. For every queue there is a url and a handler. The url for a queue is of the form /_ah/queue/<queue name>. When AppEngine is taking tasks off a push queue for execution, it POSTs to this url for the queue. The application needs to handle this post request. The post code is where the application does what is needed to be done in a task. Task queues also help in times when an AppEngine instance was terminated in the middle of a task. Each task has a task name and AppEngine remembers the name for some time. So duplicate tasks cannot be queued. There are mechanism to adjust the frequency/speed of queue execution. Each queue executes a task on it if, it has a token. Tokens are available in buckets and tokens are replenished. Apps can specify the rate of replenishing and the bucket size too. If five tasks are on the queue and there are 4 tokens, 4 of those tasks are executed. The remaining wait until replenishment. Tasks also provide a built-in mechanism to recover from failure. Failed tasks are retried automatically. The mechanism for retries can be controlled. Applications can specify task age, retry limit and back off mechanism. Again tasks queues have a target which can be pointed to a backend instance, in which case the back end executes the queue's tasks.

An example of a GAE task push queues:
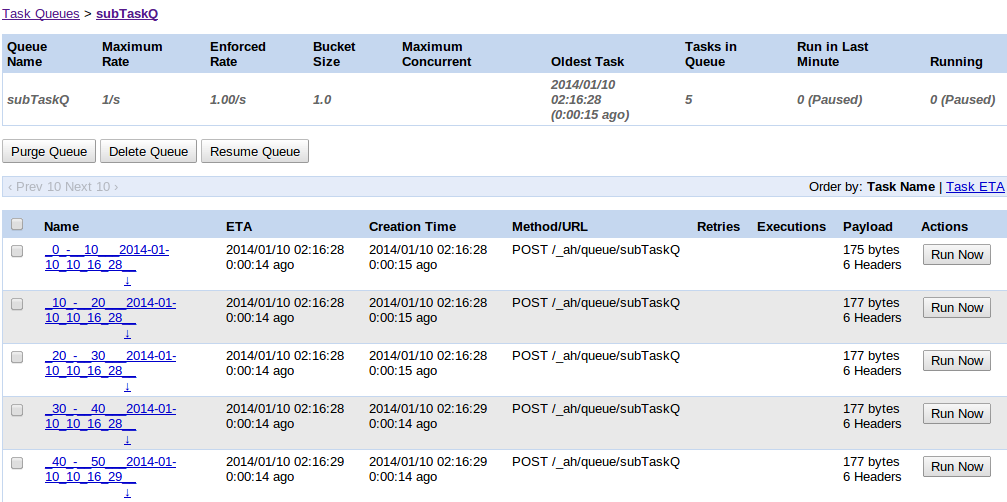
Python sample code for task queues is available here. In this example, a master queue is used to hold a master task. A master task is an aggregate task with subtasks. A sub task in this example simply counts from A to B and return a list. Master task specifies subtasks for a number of intervals A & B. If subtasks are done. Then master task is done too. The master task is pushed on to its queue. From there, it is taken off the queue and does its job of creating subtasks. The master task pushes subtasks on to a separate queue for execution. i.e We tie the task queues together here. Sub tasks get executed as and when their time comes. A unique master task (name, refer code) cannot be duplicated. The same is true for subtasks. In this example, The subtasks simply write the counts to the backends log. The log is also shown below. The back end also has a shutdown hook. (refer sample code). Parameters to tasks can be sent using key-value pairs and as payload.

a) Backend definition in yaml file. This backend is the target for queues in this code.

b) Queue definition in yaml.

c) App yaml file. Watch the url handlers for queues

d) Code to enqueue an item to a task with check for tombstoned and duplicate tasks. Task params are sent using key value pairs. Here the value is a pickled task object.
e) Master Queue status after run
f) Sub tasks in seperate queue
g) Log showing the execution

Code download for this app is available here.

Monday, 16 December 2013

Cloud Computing Application Development Paradigm: App Engine From Google

App Engine is an execution environment as a service. Behind the scenes this is a super set of all the other 'as a service' models namely infrastructure as a service, software as a service and platform as a service. Developers just build and deploy while all the software, infrastructure, platform and the like are addressed implicitly. 

In a traditional software deployment scenario, the production servers are prepped with application server software, databases, user accounts, recovery/backup in the form of standby mirrors etc. Here app deployment does not need any of that. Users still get to provision websites and web apps which will scale with demand. Plus, developers do not get hold of a virtual machine like Amazon cloud. Without a hardware/virtual instance, developers need not install anything separately for production. Memcache and load balancing is built-in to App Engine. Database is replaced by the high replication data store. Web server is out of the question because handling urls is what App Engine does best, everything is built around handling urls (web server like). Cron jobs, task handlers and back-end instances are all triggered and handled via url handlers. All in all, this brings an application development paradigm targeting an execution environment in the cloud.

Since Apps do not get a virtual machine in the cloud on which you can install anything apps wish, applications need to stick to ground rules, use the tools and community guidelines to be fast, reliable and scalable. Otherwise Apps will not be able to cut it. Serving web pages, performing offline tasks like scheduled reports, upgrades to data store models, all require that Apps stick to the rules. For example if an app breaches its memory limit it is terminated. Web apps run on process instances rather than machine instances. These process instances are one of the core enablers for scaling with requests. Instances are of different types with different capacities for memory, CPU, web request/response size, memcache size and offline data storage including logs. Instances can go from 128MB 600MHz to 1024 MB 2.4GHz. Choosing these options directly impacts your app's performance. Billing depends on, where applicable, the services in which you overrun your quota above what you already paid for. 

On a lighter note the billing mechanism can be summed like this. You rent a Ferrari. But then you pay extra 10 cents for every turn of each tyre if you go over 40 miles per hour. And you pay 20 cents if you do a reverse and 15 cents for every oscillation of the windscreen wiper. Every now and then there is a chance that your Ferrari will be terminated and restarted remotely.  The point is, billing and execution environment can be frustrating at first (possibly eternally) if not understood correctly.

The data store will experience contention if an App throws quite a lot of stuff into it sequentially. Contention leads to timeouts. But, App Engine retires data store ops as such. But it is better to have a retry in app logic too with a back off mechanism. This is officially advised too. Data models are really flexible. But queries are learned during development and App Engine readies indices before hand. 

Task recovery mechanisms in case of failure take priority one, if it was not already that. Servers in warehouses have a higher failure probability than servers in house. This is mainly due to the sheer numbers involved. If you have 10 high end machines in-house the chances on one failing within a year could be remote. But on a cloud data center with 10000+ servers the probability of servers going down or needing replacement/maintenance just goes up. As a start up noticed over years that their Amazon instances' life span is on average 200 days! What about App Engine then? We are dealing with process instances so disruptions are pretty much normal and immediate. Instances especially back ends will be terminated without much warning. So either way having your processes running on machines/instances somewhere far away means that there will be disruptions. Apps can register for shutdown event handlers to do something before going down. Also there is no guarantee that this will be triggered. 

Again if Apps are running a huge task say collecting information from the web to process offline and then deliver to the client later; Apps need to address disruptions in the sense that apps need to be able to recover from the point where a huge task failed due to a cloud infrastructure problem. This makes you do two things in particular on App Engine, breakup tasks for independent execution and handle breaks using the platform mechanism. App Engine allows this with Tasks and Task queues. The idea is Apps must break a huge task into manageable units which will be run independently. Otherwise apps risk continuous disruptions from quota overrun such as memory limitations or request timeouts or data store contention. One or the other. 

One robust solution is to have a task chains. Tasks will do a small amount of work and before finishing, queue the next task to be executed. Failed tasks in a queue will be re-tried. App Engine prevents triggering the same task over and over again by using Tombstoned task names. Simply, it remembers a task name say for a day and does not allow a task to be queued in the same name. So imagine your taskA triggered taskB and taskA failed for some reason without spawning the rest of the tasks taskC and taskD. When it comes back online it won't be able to add taskB. taskB will be executed from the queue as and when its time comes. There are a host of retry mechanisms like token buckets and back offs.

Tuesday, 26 November 2013

Google AppEngine BackEnds in Python

AppEngine backends allow us to perform long term, memory and processor intensive work. As the name suggests these are for back-end type work loads. Say for example you are crawling and scraping websites to collect price points from multiple sources to serve later or just doing a report. These types of tasks can be done on the back end. AppEngine backends are separate instances from the front end instances. In terms of quotas, this means a lot. Instead of clubbing all your work on the front-end instances, you can do work on the back end and save hours on the front end. 

An important thing to bear in mind is that AppEngine backends share URL and code with your main app. Backends are part of your app but seperate instances. They are accessible via their names plus the main front end app as shown in the screenshot below. All the urls that your front end app exposes are available to the backends too. For example if your AppName is backendstest2013, you access the app as backendtest2013.appspot.com. And, if you have a back end named backendone, you trigger/invoke the urls on the backend as backendone.backendtest2013.appspot.com/<same URL here>

There are two types of back-ends dynamic and resident. Dynamic backends are started on the first request and stay alive for the request. After some idle time, they are taken down. Resident backends are always on. 

Here is an example of a python backend for AppEngine. A zip of source code is available here. The folder structure for this example is shown below. Project folder is backend_trial.

The App takes two URLs "/" and "/scripttest". The handlers are defined in app.yaml as shown here
There is a controller servlet like handler defined in backendtrial.py. This handler for the main page or default app page just shows some settings. The handler for "/scripttest" inside backendtrial.py is shown below.
AppEngine backends for python are configured in backends.yaml. The file is shown below.

We declare one instance of class B1. It is dynamic and publicly available for access from outside the main App. Class puts limits on your CPU and memory power. B1 is least with 128MB and 600MHz. Class B8 has 1024MB and 4.2GHz. 

The code for handling URL "/scripttest" is shown below. We will access this from both the app instance and back end instance. The code just prints the backend name from the backends.yaml file, if the code is executed from a backend.
Upload the app using command
$ appcfg.py update backend_trial

Upload backend info using command
$ appcfg.py backends backend_trial update

Test the main app and back end by Accessing the app using URLs
1) Main App
2) Backend call
Source for the project is available ->> here

Thursday, 24 October 2013

A coder post : Link inversion traversal to scan tree in constant space

This is a coder's post and discusses a binary tree traversal technique.

Binary tree is a popular data structure and there are a couple of popular tree traversal techniques. One based on recursion. This includes pre-order, in-order and post-order traversals. The second by using an auxiliary data structure to travel the tree level by level. A pre-order traversal visits a node first then its left child and then its right child. For the example tree below, we visit in pre-order NY then Chicago then Seattle. If it was post order we would see the nodes/places as we travel the tree in this order Chicago, Seattle, NY.


A recursive pre-order traversal code is shown below. i.e we visit a node first then, its left and right children in that order.
The second technique uses a stack as an auxiliary data structure to hold the next nodes to visit. This algorithm pops a node of the stack. Visits the node and pushes its children onto the stack; right child first. To start off push the root of tree on to the stack. For the example tree, we push NY onto the stack. Then, until the stack is empty we pop a node i.e NY here off the stack. Visit NY and then push Seattle and Chicago onto the stack. And repeat. You get the idea.

Recursion has memory, performance overhead for recursive function calls. The auxiliary data structure also has memory overhead. Link inversion traversal goes through the tree as if the links form a solid wall. i.e Imagine walking through your home with one hand always touch the wall. You would have followed the wall(s) one after the other. Similarly link inversion starts from the root walks through the links as if they are walls. An example shown below starts at New York and ends at New York. The exclamation shows the visits. Each node is visited thrice. One each for the pre, post and in-order concepts. (Refer the code below).


Link inversion traversal, uses the tree pointers themselves to store backtracking  information. i.e while going down the tree the links are reversed to aid back track instead of an additional data structure. The links will be restored on the way back through the tree thus leaving the tree as it was. Link inversion traversal needs a couple of extra node references. Also, a bit field on each node to signal the direction we went after first looking at the node. So link inversion generally is referred to as scanning the tree in constant space.  A link inversion code snippet is shown below. The full code for the post is available at the end.


Profiling performance: Link inversion traversal is definitely faster than a pre-order traversal.
Input: A balanced binary search tree of 300+ city names. The link inversion code shows up faster on Netbeans profiler. Notice the recursive time and link inversion time in the screen shot below.


Source code for Link inversion traversal is available at the link below:
https://drive.google.com/folderview?id=0BxhHg0qy5gi4dTlWUC1KU0RUUUU&usp=sharing

References:
1) Data structures and their algorithms by Harry R. Lewis & Larry Denenberg.


Thursday, 12 September 2013

Big Data Analytics: Using Python UDFs for better managing code and development

Apache Pig is a data flow scripting language. We specify how we want the data to be grouped, filtered etc. It generates hadoop mapreduce jobs corresponding to pig statements. But Pig does not have functionalities of a general purpose programming language. User defined functions help by allowing us to extend Pig. We can specify our data manipulation along with Pig operators using UDFs. For example if we are filtering data, we can write a UDF to do this our way. Then, ask Pig to use it by saying FILTER by. In a previous post we saw how to write User defined functions in Java.  As mentioned in the post, since Hadoop and pig are already in Java it make sense to write a UDF in Java. Also it was mentioned that writing a UDF in Python could mean less effort and better code management.  

For Java we create a jar file which contains our code for the UDF. We register that jar with Pig. As the number of UDFs goes up and changes become frequent even in development stage this adds to the effort. Changing the code, testing, jar it, then see how it works with pig. This could end up taking a lot of time.(Refer the previous post).

To save time on development iterations, we can embed Apache pig in python scripts. We have seen this too. UDFs can also be in Python which make things a lot easier. There is our pig script embedded in a python file. UDFs can be in the same file or as seperate modules in the same project. The net effect is that you avoid the overhead of heading over to another project to change and jar your UDF. There is also the case of specifying schemas of your UDF's output. This is extra code in Java but, in python it boils down to annotations. Basically less code to write and maintain. Deployment also becomes easier. Python UDFs and simplicity involved are demonstrated below.

There are two ways to use python and pig.

Examples: We have a dump of data from seismic sensors. We need to find all the locations where there has been an earthquake of magnitude > 5 and we want the number of such quakes over the data. We filter data a UDF and we use another UDF to align data properly.  Python UDFs are used are for sake of demo. The full code for the project is available here. Notice that everything is under one project. In the code there are two folders QuakeDataRunner and QuakeDataRunner2 which demonstrate both these approaches.

A) One is to seperate the python (UDF) and the Pig script that used the python UDFs.
In this case, import the UDF file into the Pig script using jython. Pig uses the internal Jython engine for this purpose. The files are shown below. First the Python UDF is as follows


The Pig script which uses the UDF above is as follows
Run the code as follows
If you have pig in your PATH you can run it as pig -x <pig_file> from the folder.

B) Embedding Pig script in Python
Here also the program structure does not change. All that needs to be done is to use the Java wrappers for Pig in Python. This code is also run with pig command. The UDF file is the same as above, but the main program is a Python script with Pig as follows

Run the code as follows. As before you can add pig to your PATH to avoid referring to the pig executable in every command.


Click for Code used this post

References:
1. Programming Pig by Alan Gates.
2.Embedding Pig in scripting Languages by Julien Le Dem.